Introduction
This tutorial details how to build a volunteer portal for Pawsitive Steps Sanctuary, a fictional dog shelter. The portal streamlines volunteer coordination, animal care, and activity scheduling.
Why use Pory for building portals?
🔓 End users won't need to know or use Airtable.
💰 You won't need to purchase extra seats for users.
Prerequisites
- An Airtable account
- Professional plan subscription. Learn more about pricing.
- A table for users on Airtable with at least an email field (required for user accounts).
Objectives
- Staff can log into their account to create, edit and delete new schedules for the week and dogs.
- Volunteers can log into their account to view schedules and update their profile.
Airtable Base
The Airtable includes 3 tables: Users, Walk Schedule and Dogs.
-
Users Table: Manages volunteer and Staff members with fields like ID, name, contact, availability, preferences, and bio. It helps align volunteer preferences with specific dogs.
-
Walk Schedule Table: Facilitates scheduling and tracking dog walks, featuring schedule ID, date and time, time slot, volunteer ID, status, and animal ID.
-
Dogs Table: Contains details of each dog at the sanctuary, including ID, name, breed, age, special requirements, and walk frequency.
You can copy this base into your account here.
It is important to store everyone who needs a user account in your portal in the Users table. I.e. Volunteers and Staff members etc.
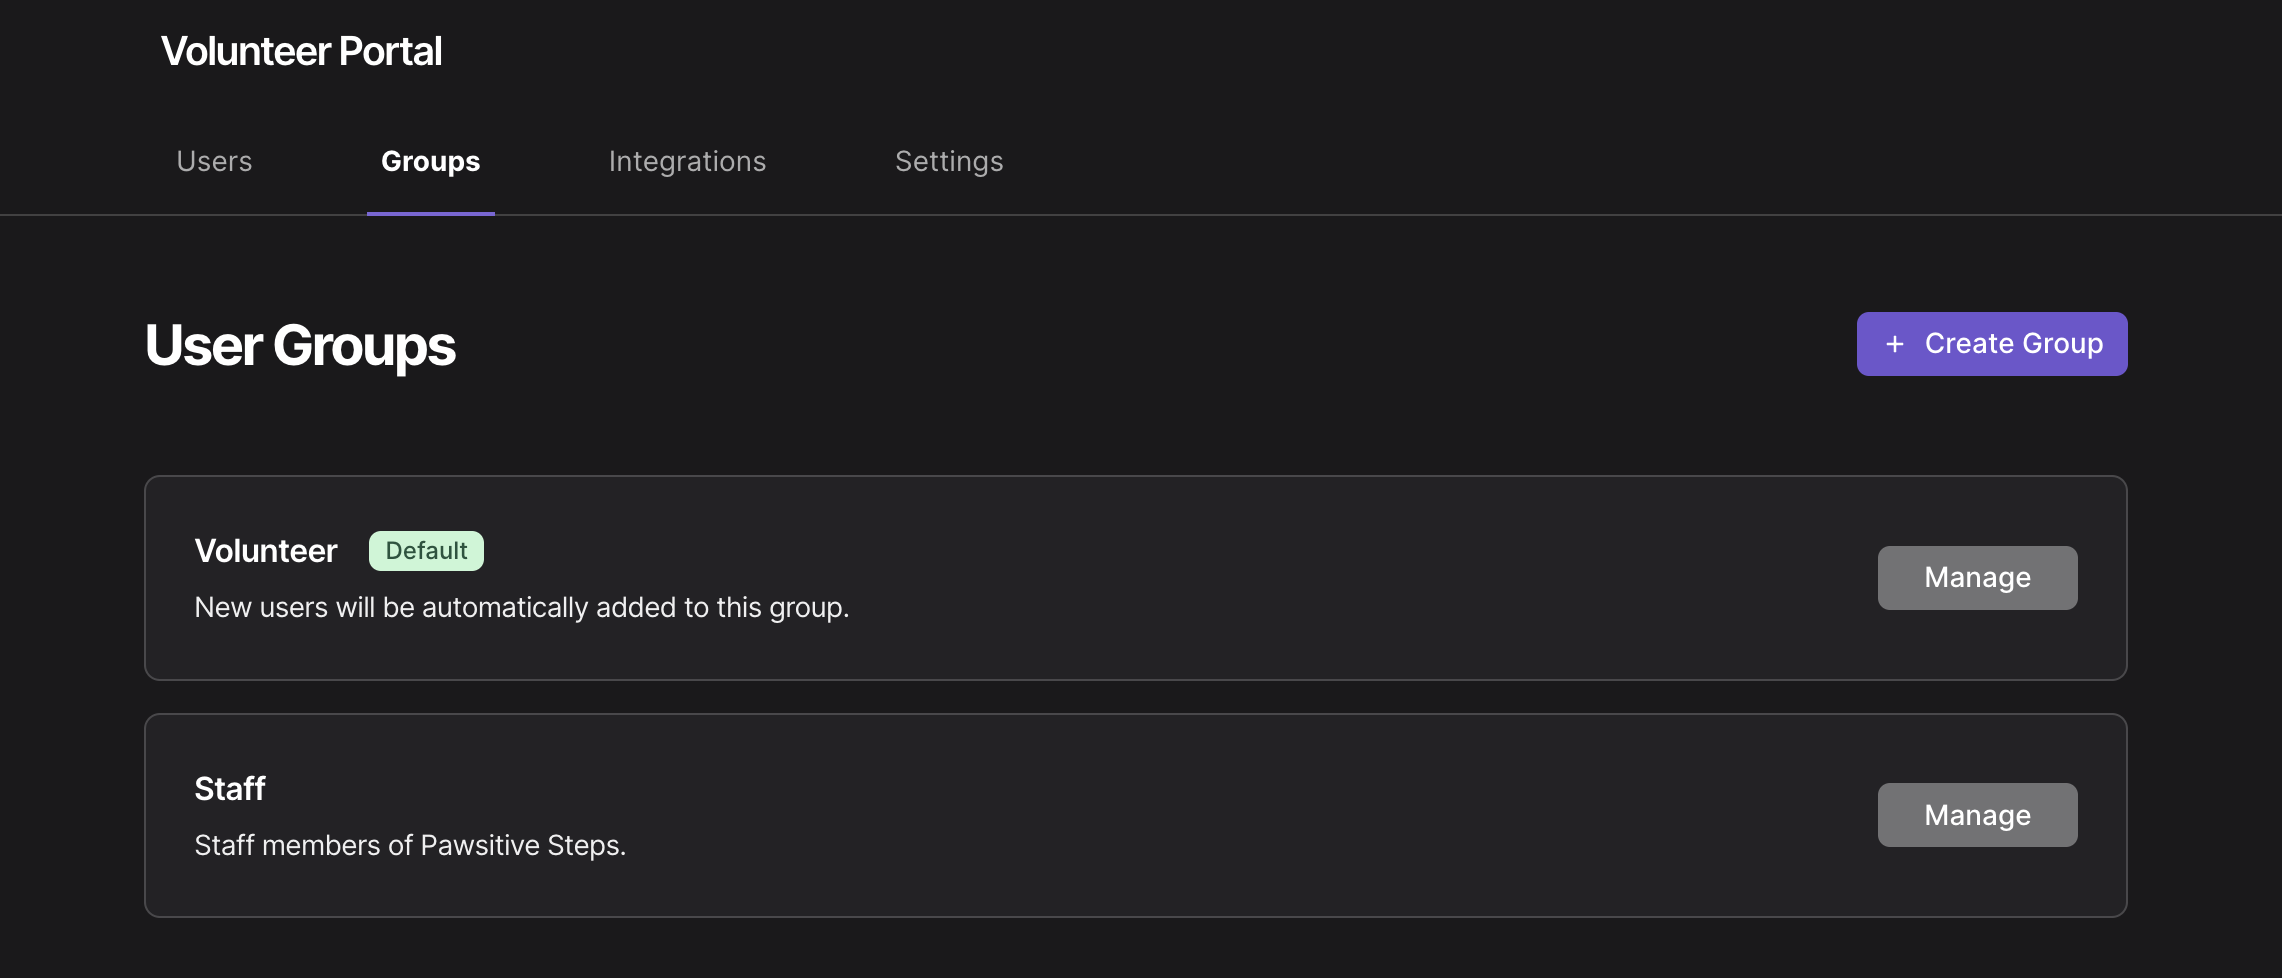
Pro Tip: To manage different groups of users in the Users table, we recommend creating a Single Select field called Groups to categorize users and then organizing each group with an Airtable View.
Step 1: User Management
The volunteer portal will support two groups of users: Volunteer and Staff.
-
Let's start by setting up user accounts in the portal. Follow the instructions and enter Volunteer for the default group (skip if you have already completed onboarding).
-
Now let's create the Staff group.
Step 2: Dog Directory
Let's create a dog directory for the public to fall in love with.
- In the portal editor, create a new page called Dogs for the public to view.
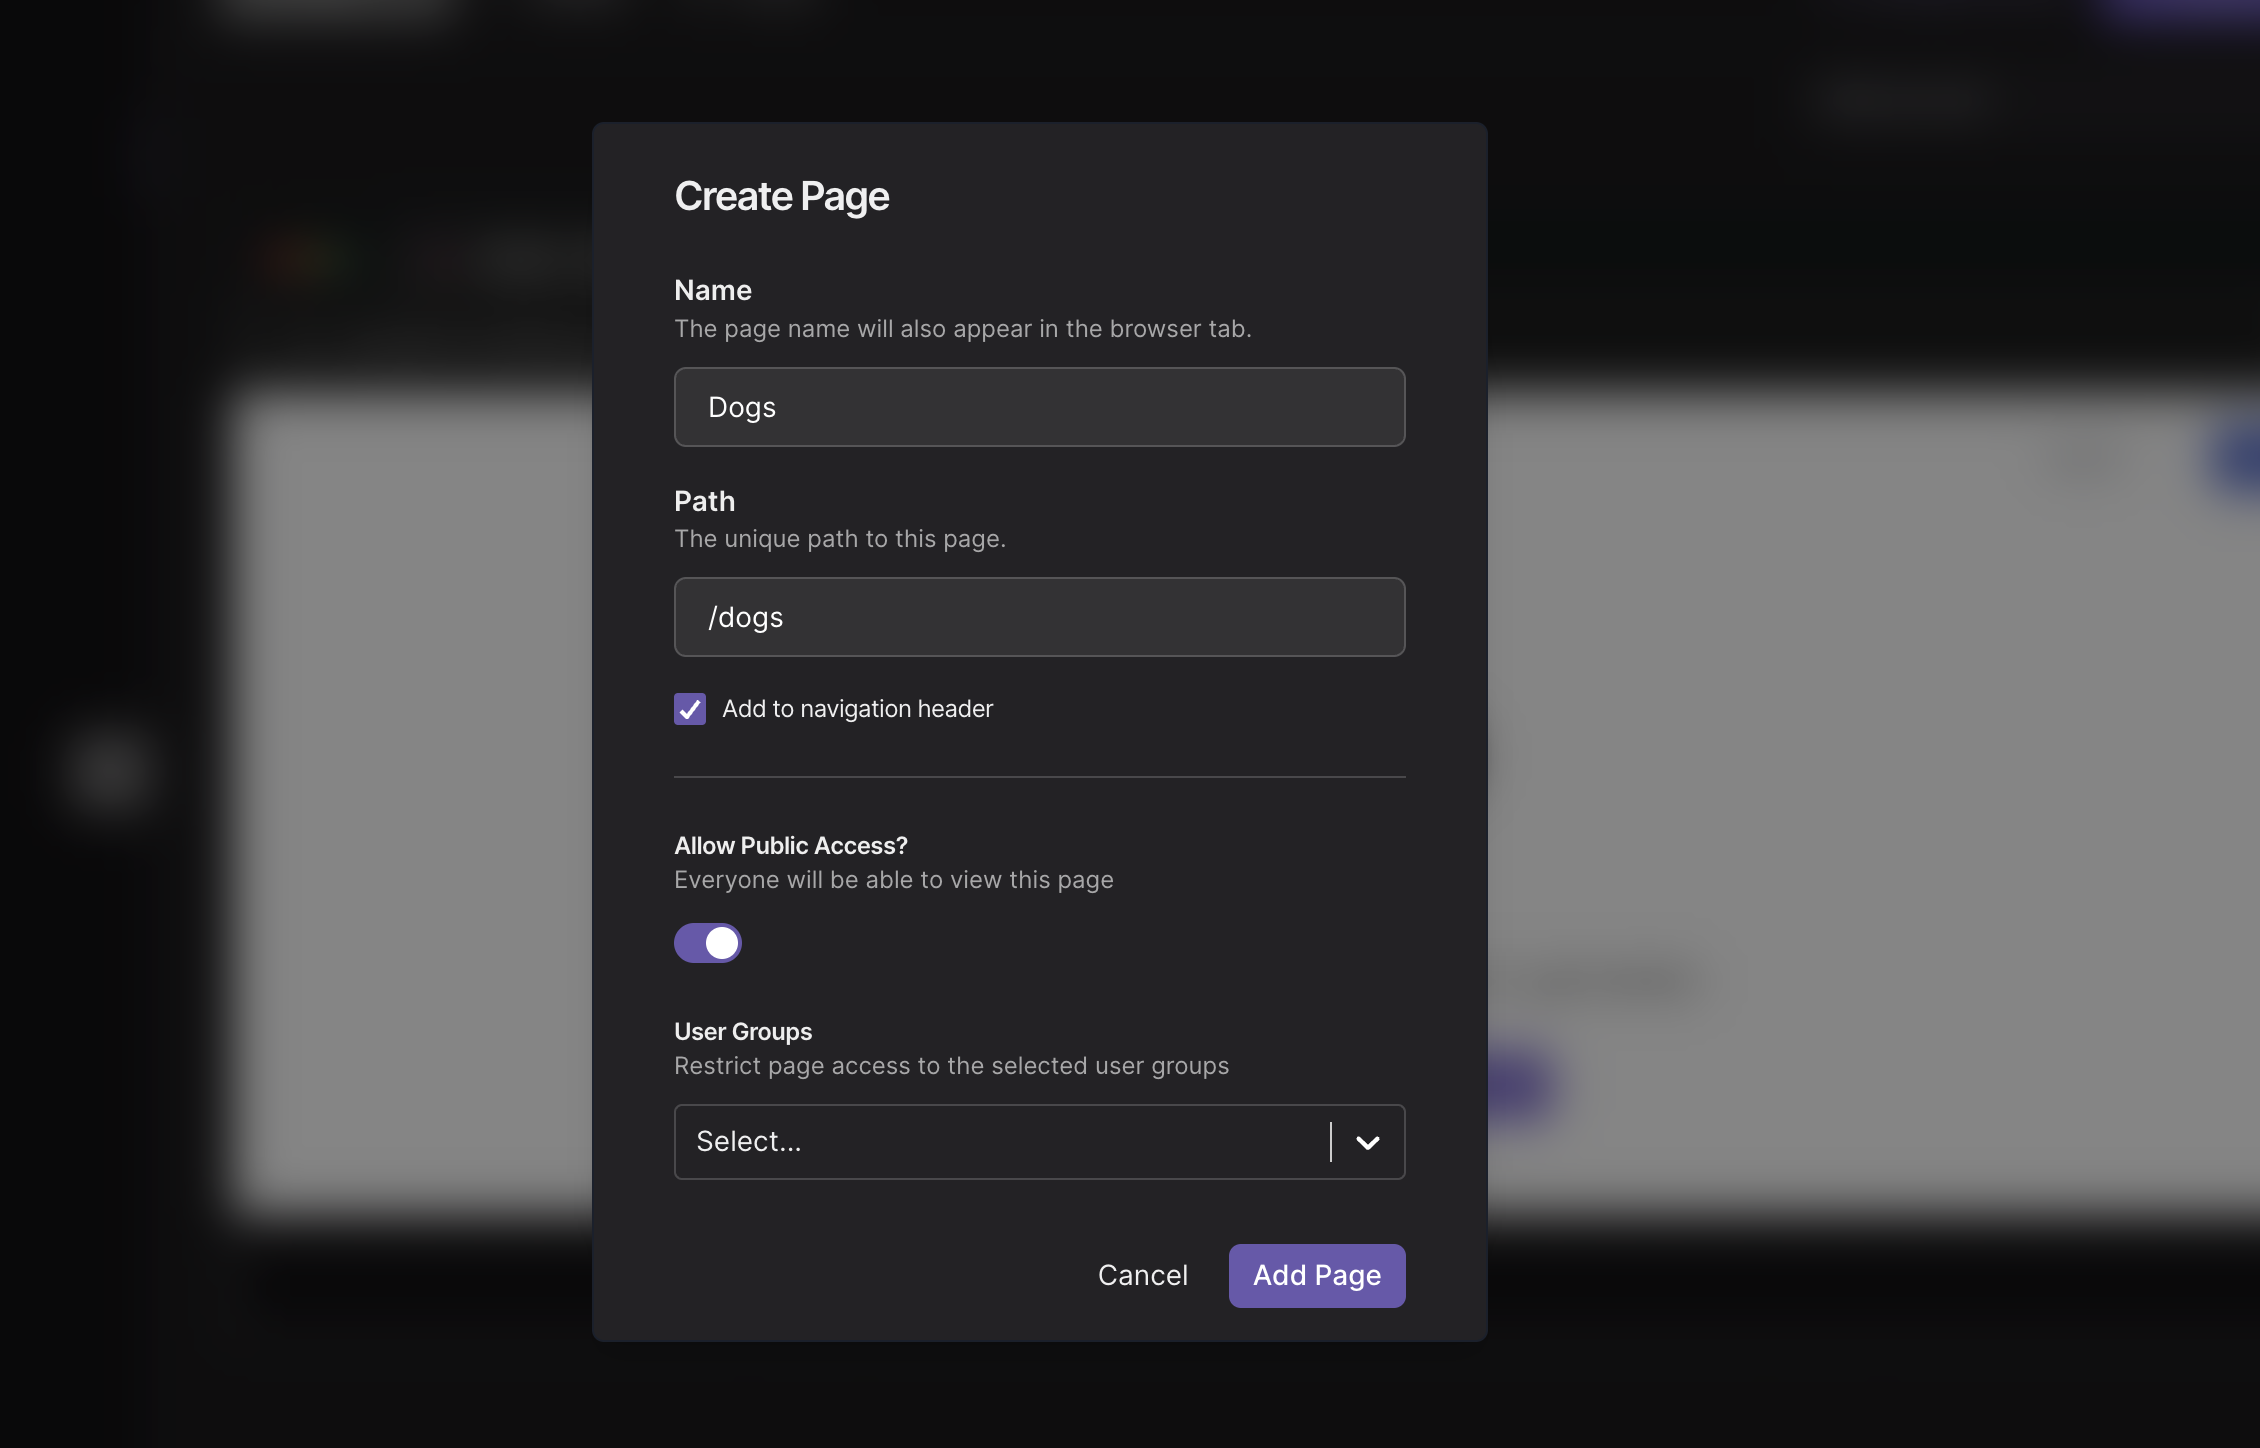
- Create a Airtable listing of dogs.
Is this a user listing?: No (everyone should be able to see this listing).
Airtable Base: Volunteer Portal (You can copy the base above into your account).
Airtable Table: Dogs

- Select the fields you would like to display in the listing, search and filters.
- Switch to the detailed view and add blocks to display more information about the dogs.
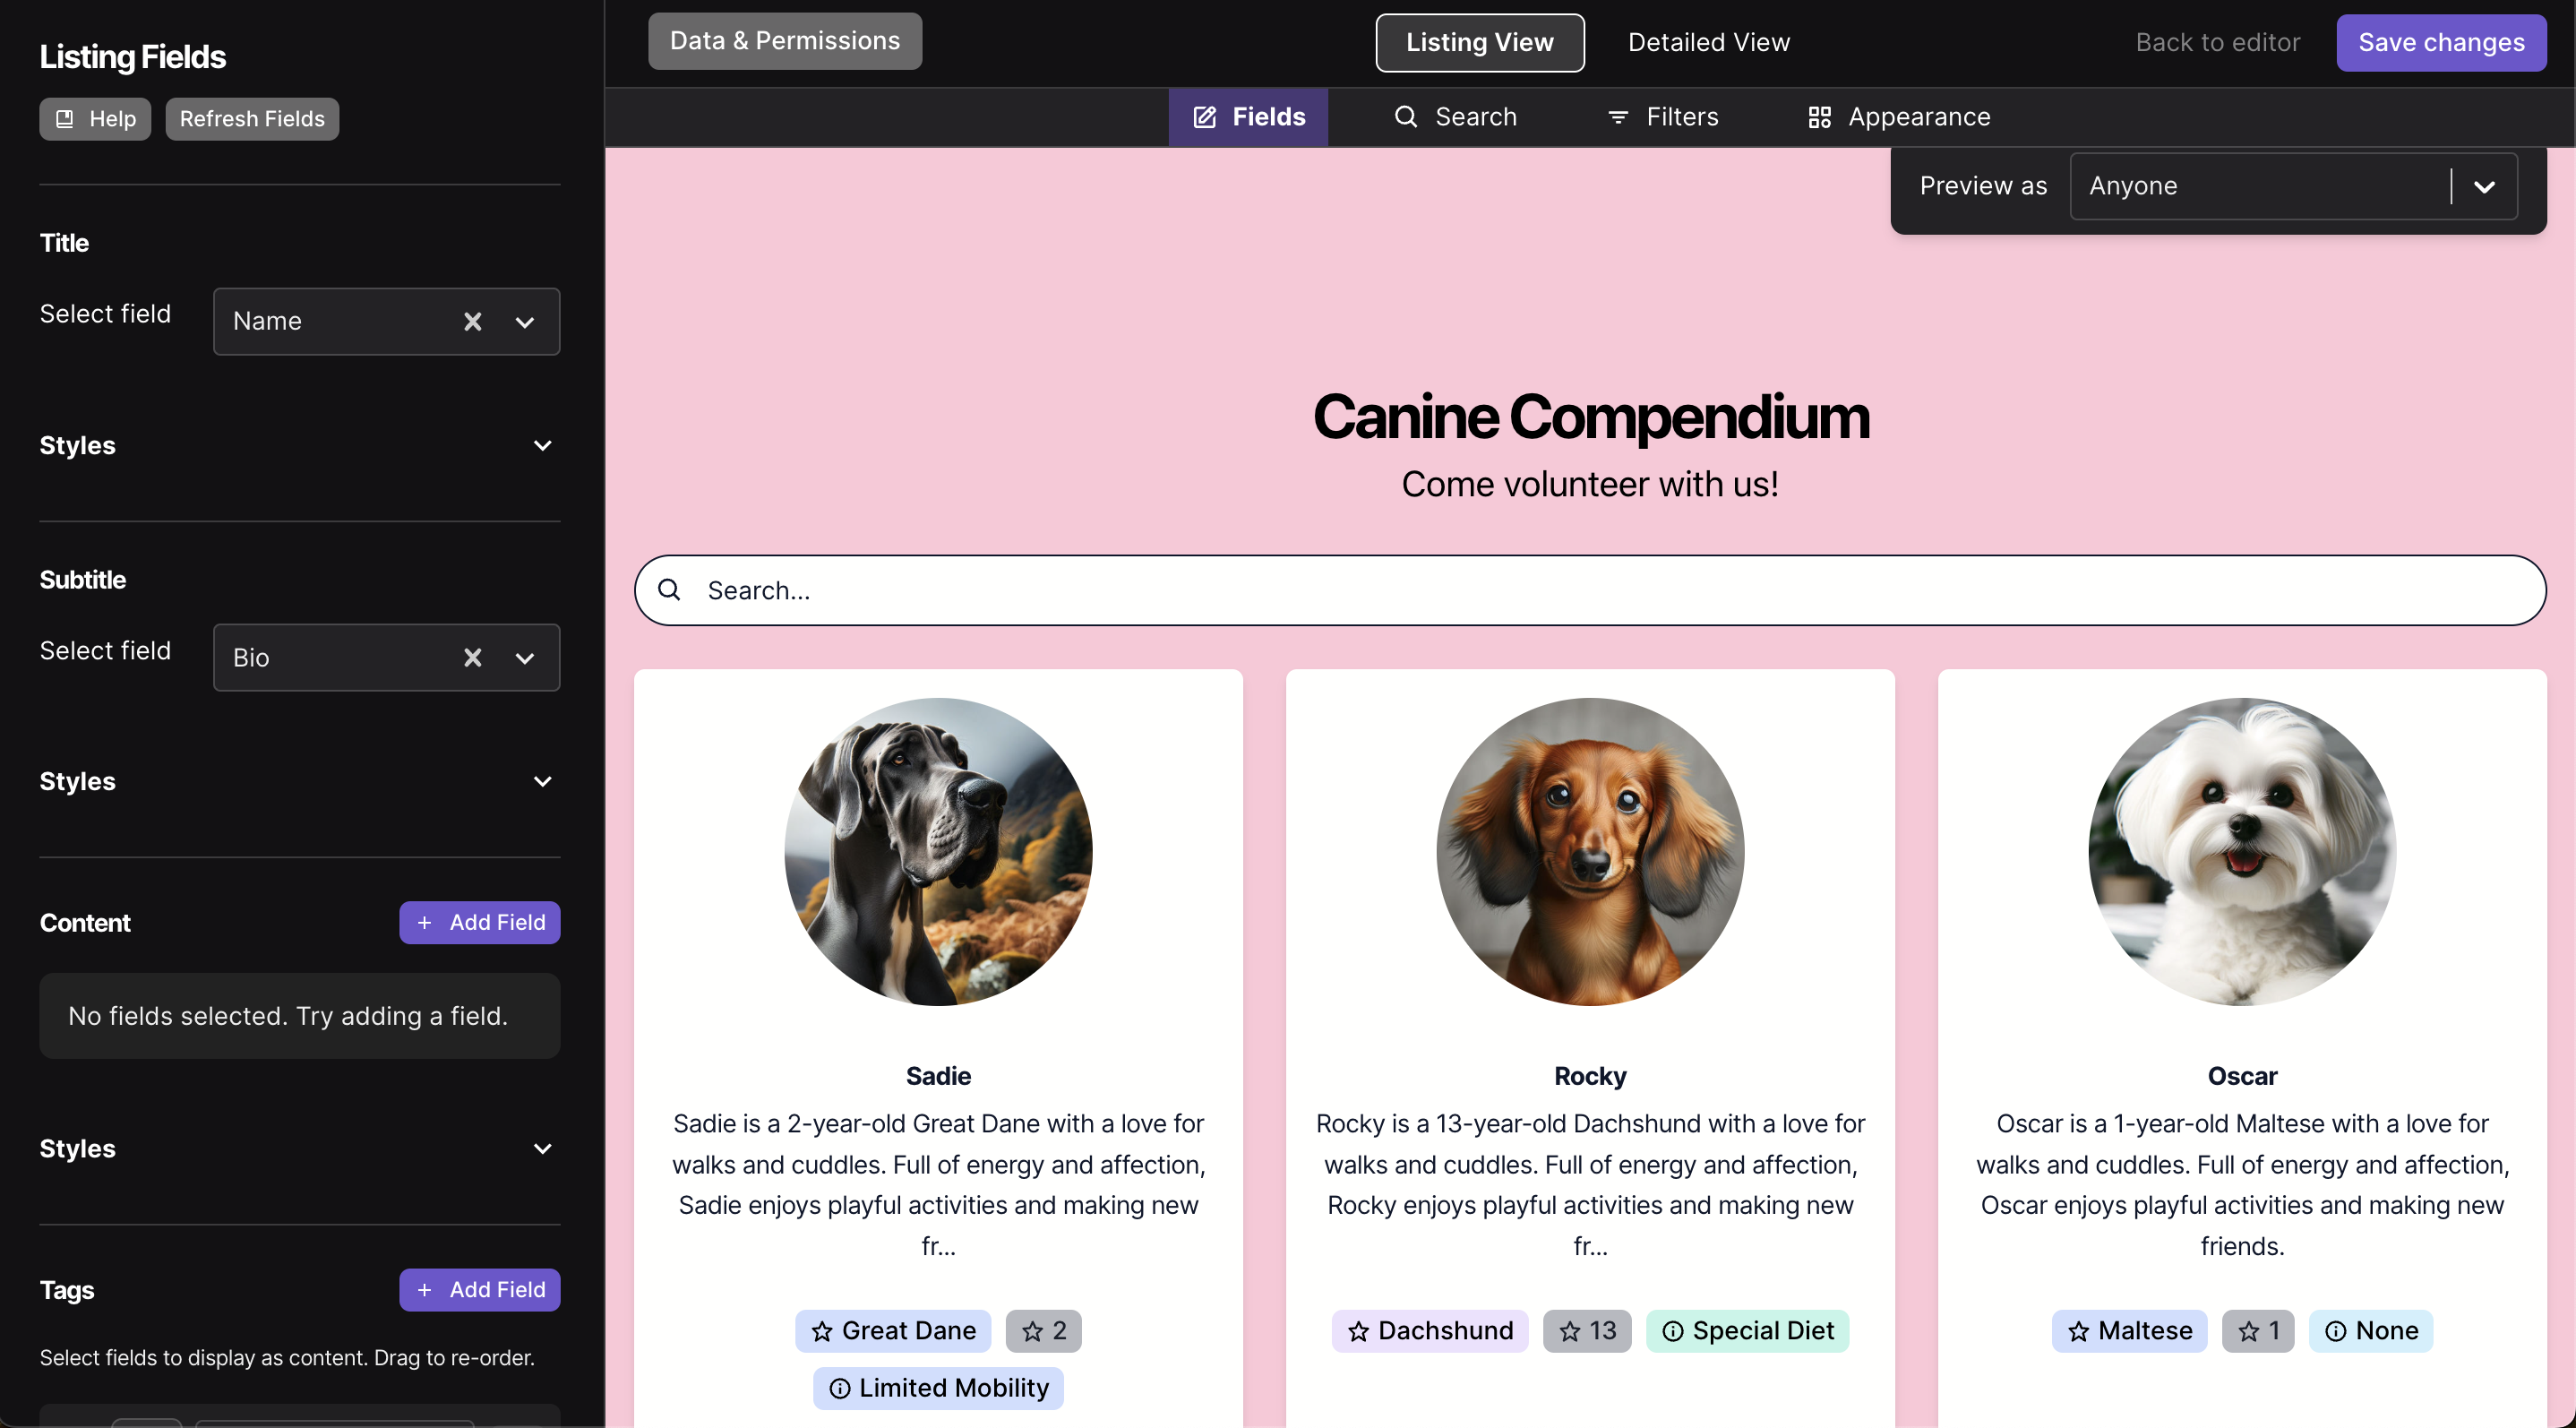
- When you're happy, click the Save Changes button
Check out the dog directory here.
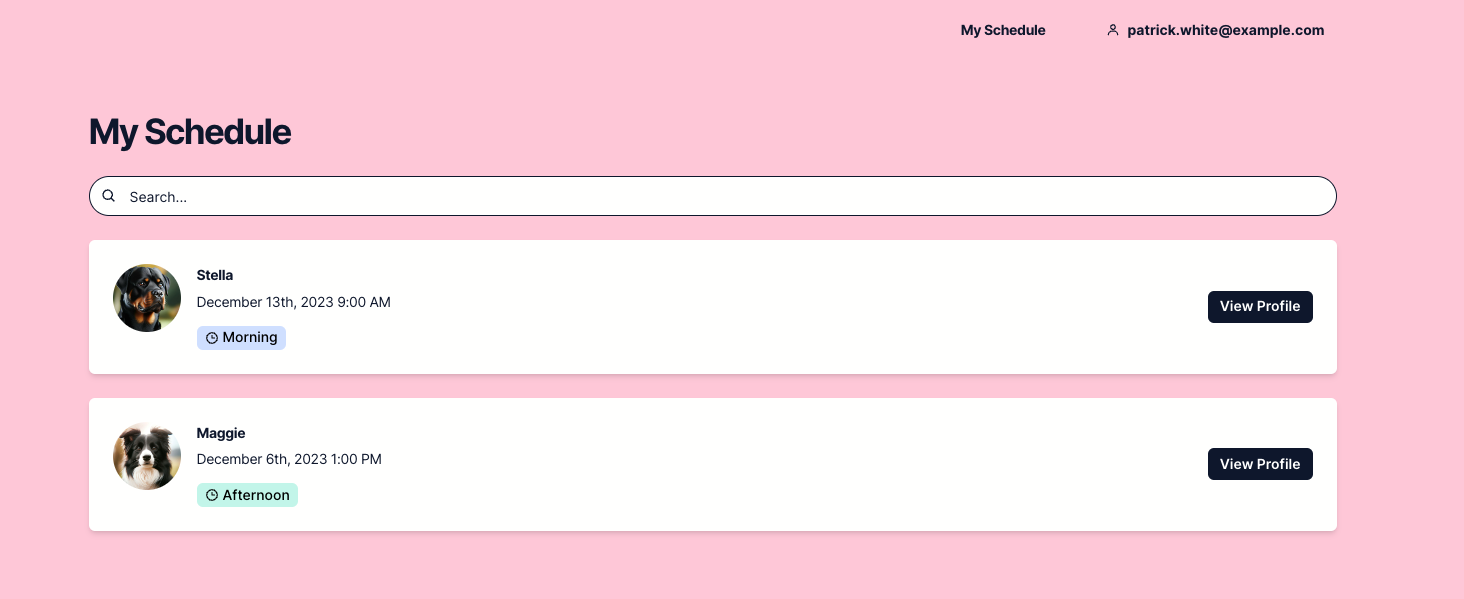
Walk Schedule (for volunteers)
Let's create a listing to view and manage walk schedules. This listing is for volunteers to see their own schedules only.
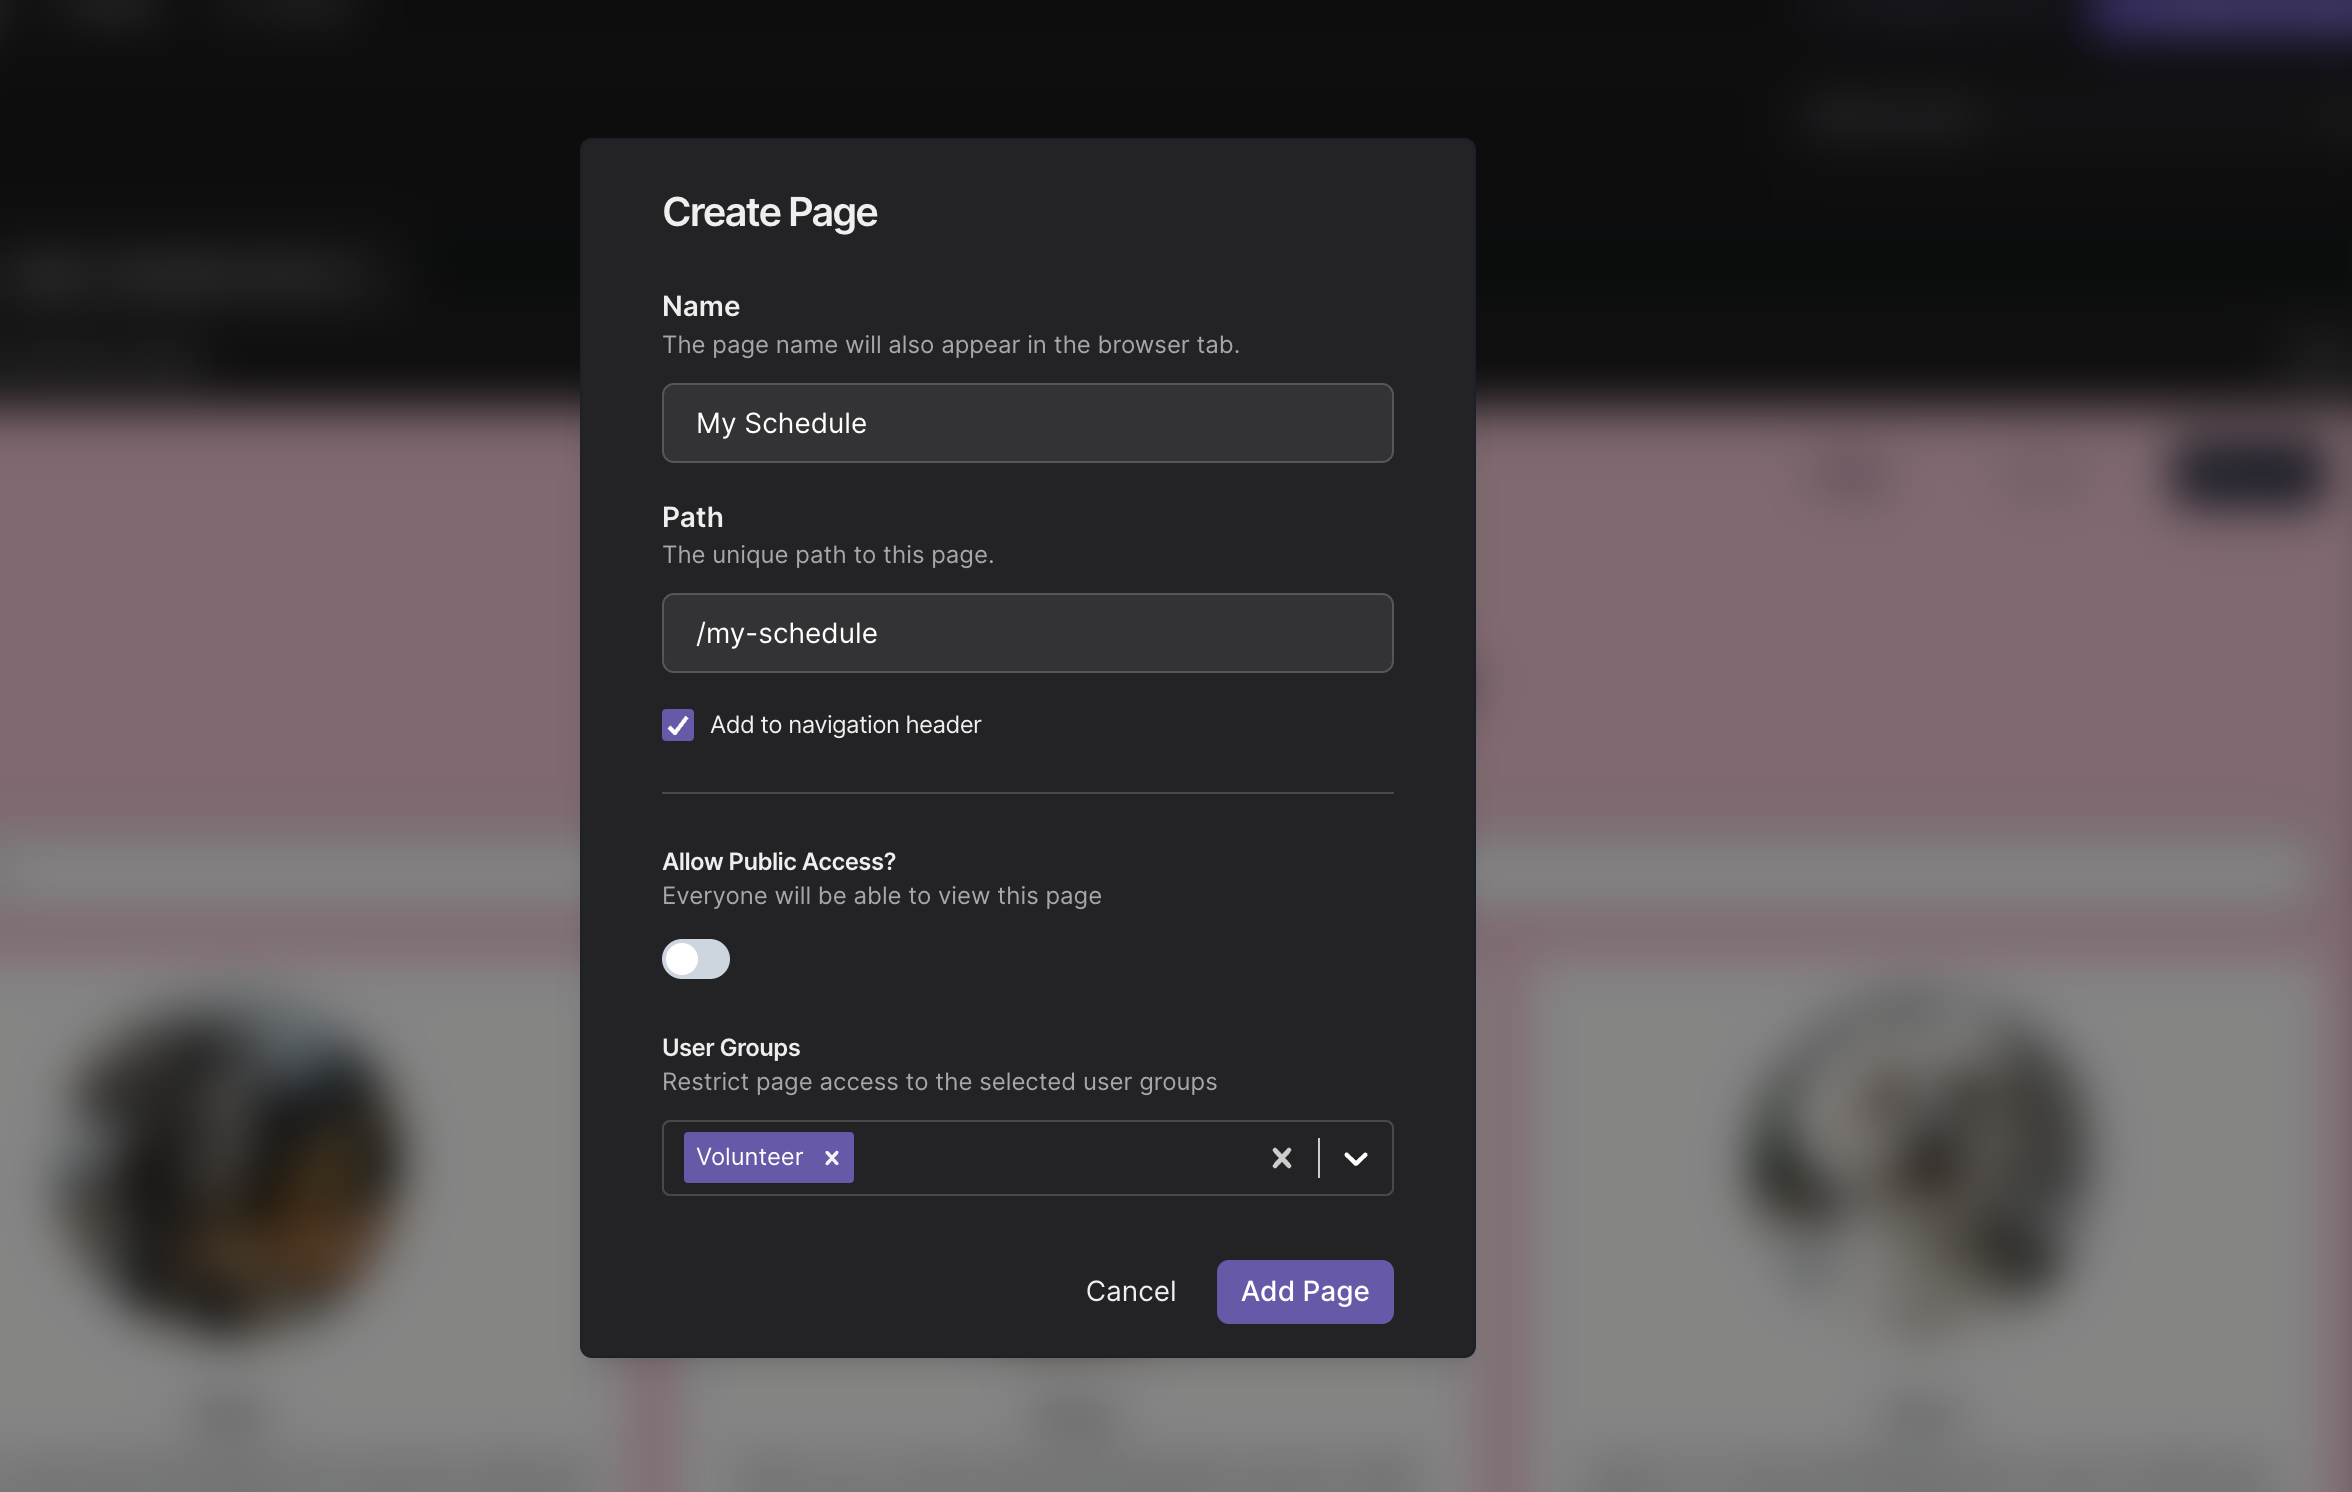
- In the portal editor, create a new page called My Schedule and restrict it to the user group Volunteer.
- Create a Airtable listing for the schedule.
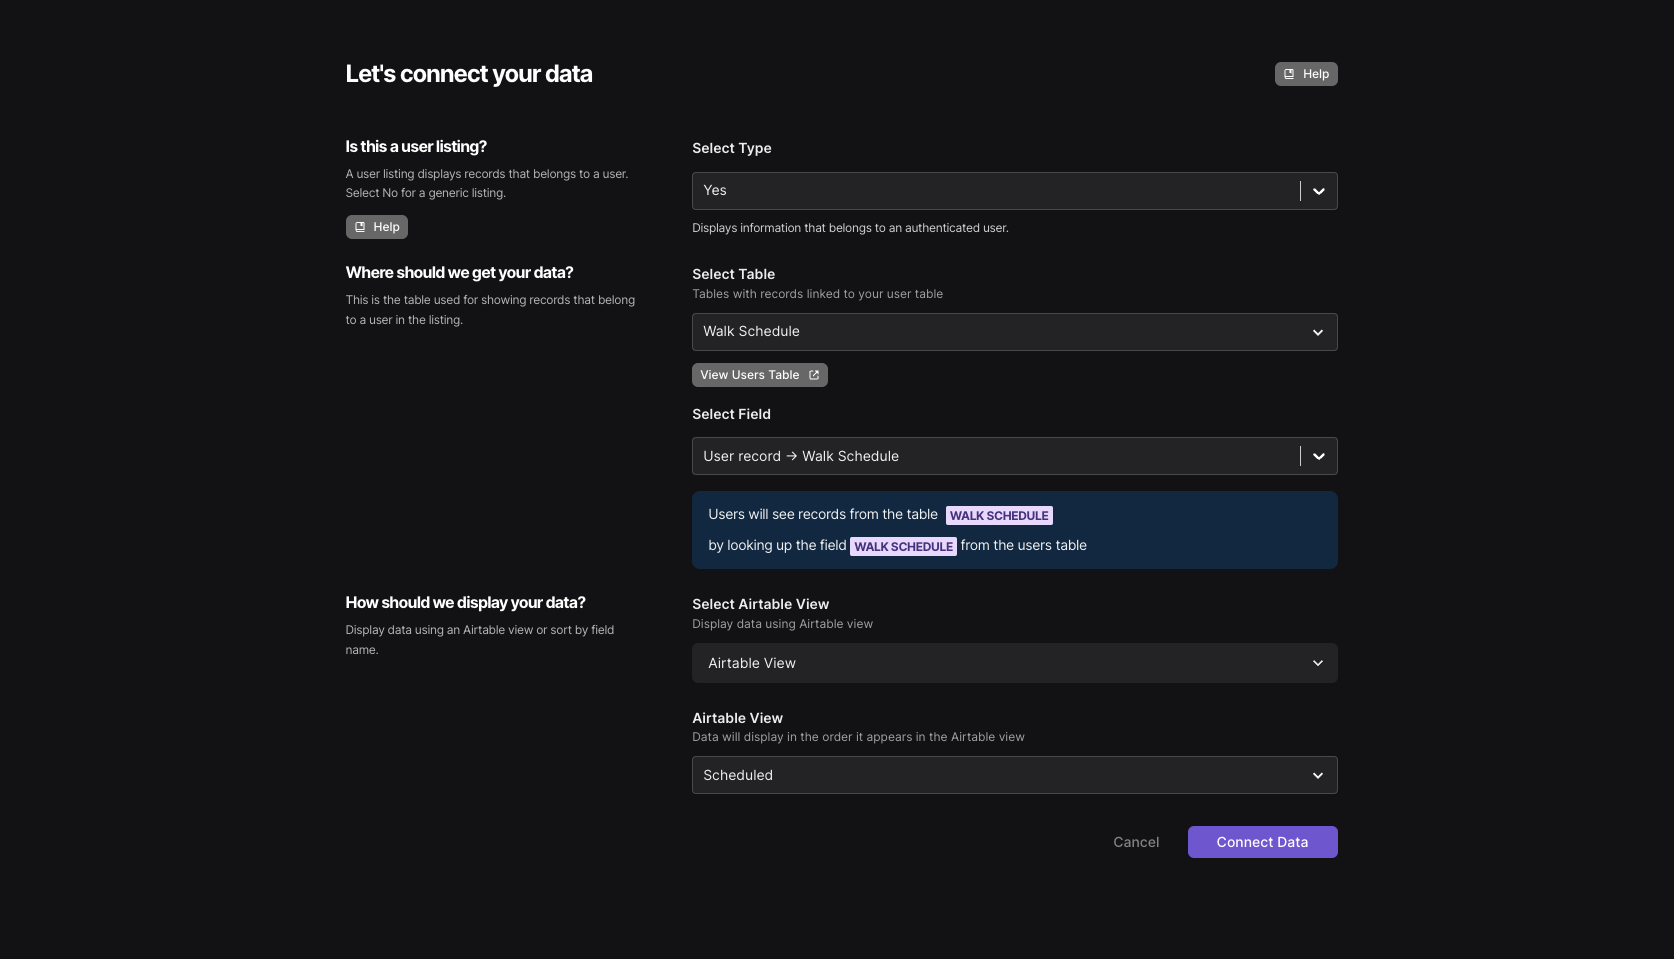
Is this a user listing?: Yes (volunteers should only see their own schedule).
Airtable Table: Walk Schedule
Select Field: User Record -> Walk Schedule (users will see records that are linked to them from the field Walk Schedule). Airtable View: Scheduled (We only want to see schedules that are not completed)
- Select the fields you would like to display in the listing, search and filters settings.
- Switch to the detailed view and add blocks to display more information.
- Click on Data & Permissions and update permissions for the Volunteer group to include the action to Remove schedules.
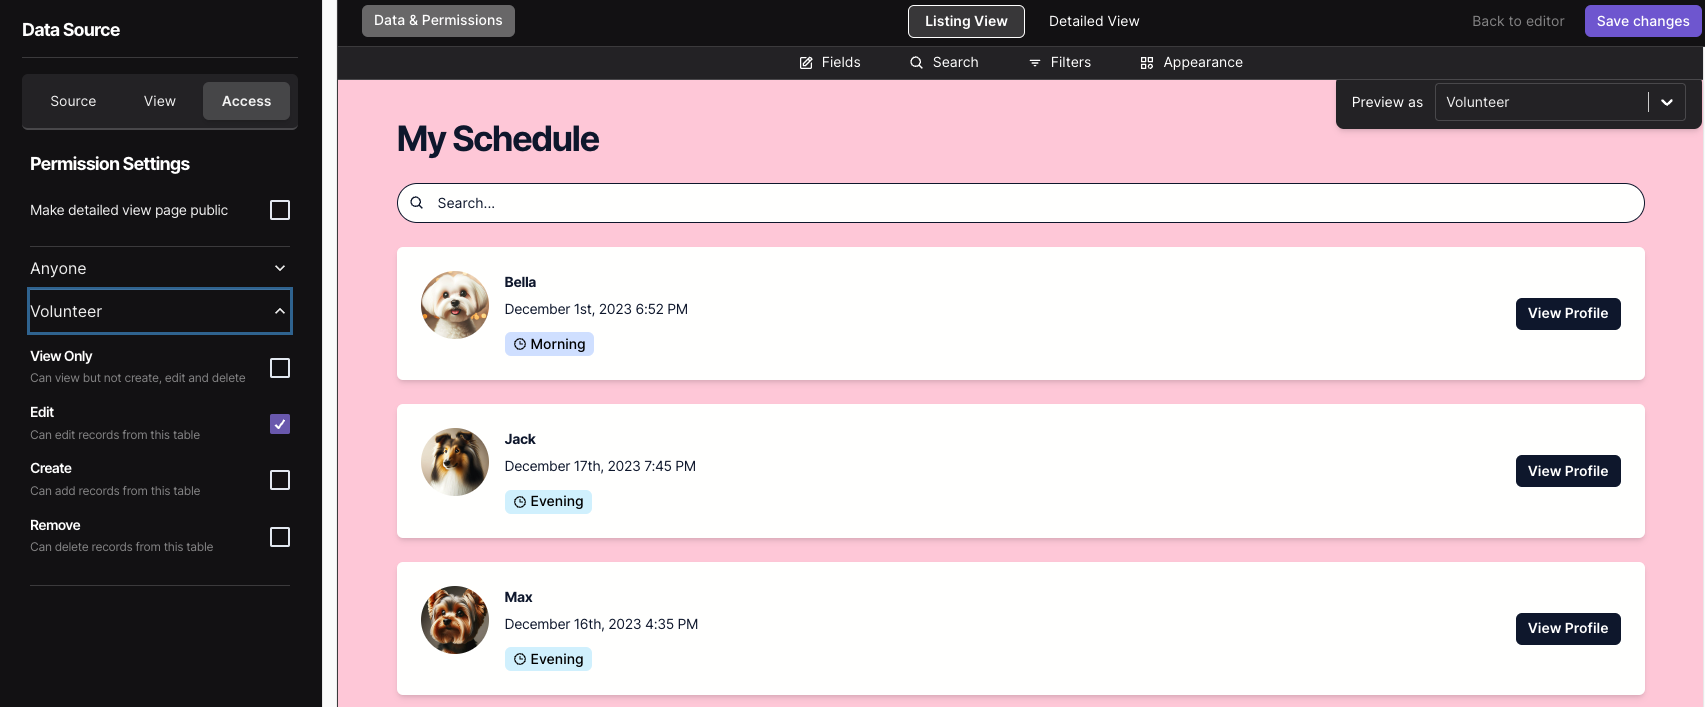
You can test out the permissions by Previewing as a user group.
Check out the My Schedule page here.
The ability to edit schedule has been removed for the demo account.
To test permissions, please create your own account in the portal by signing up.
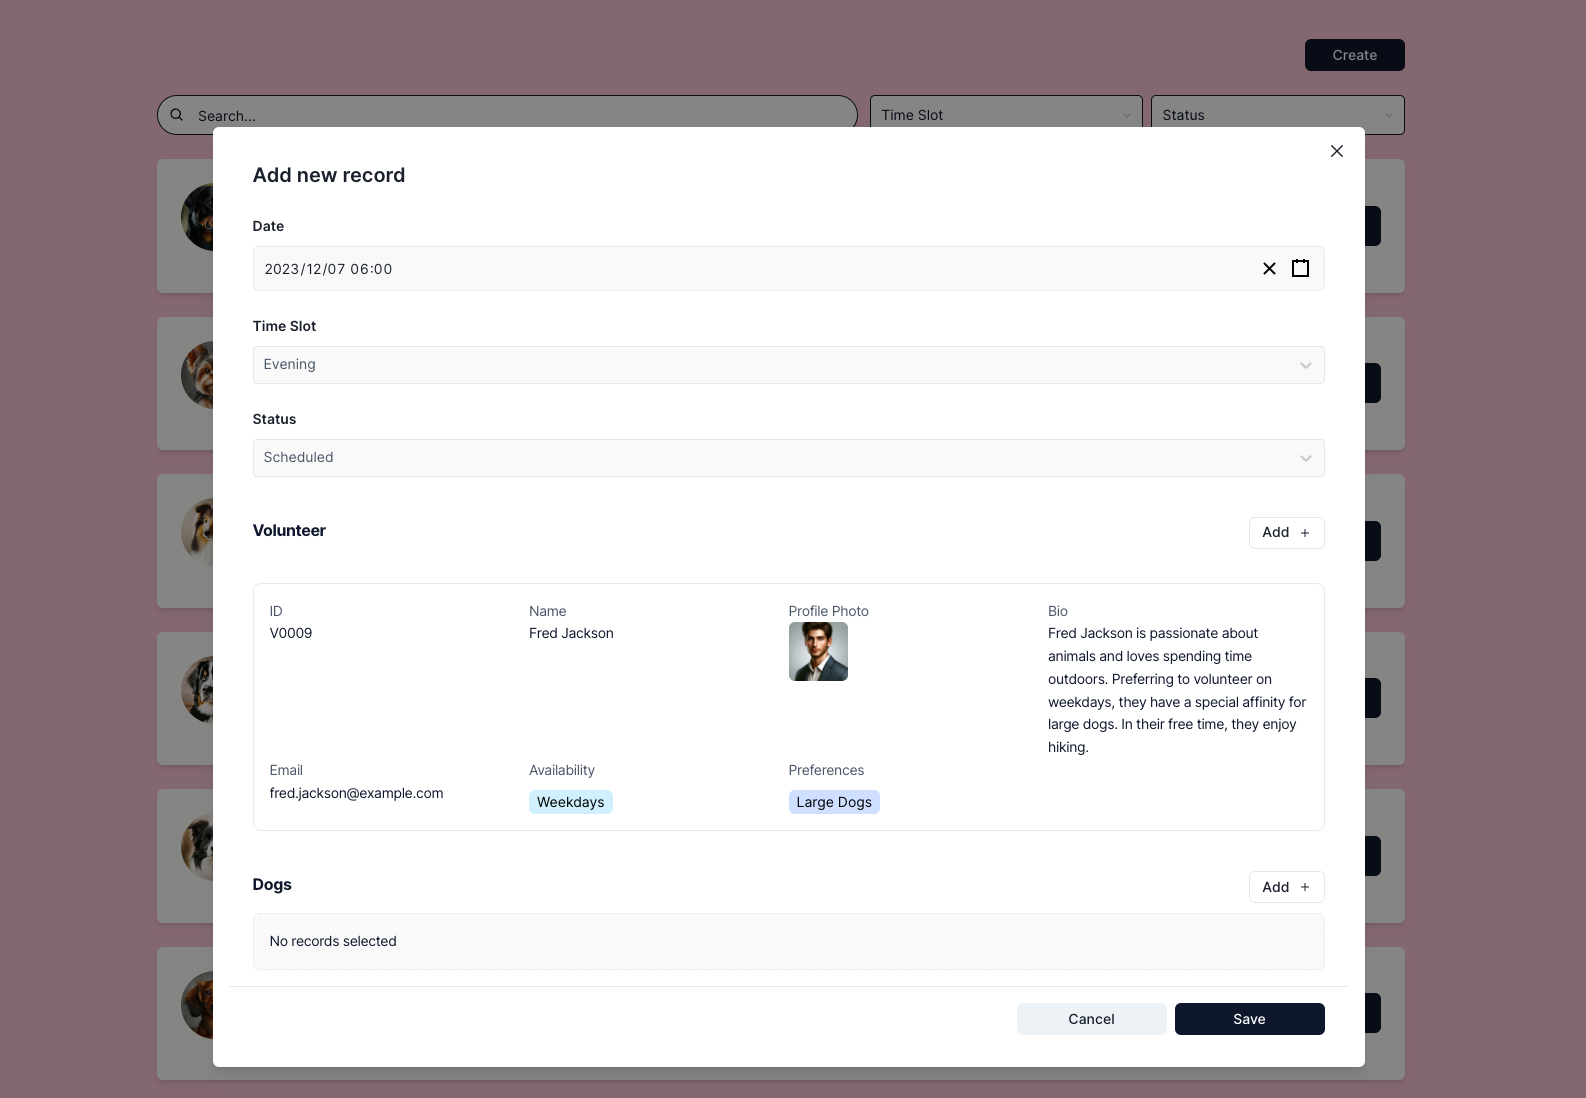
Step 3: Walk Schedules
Let's create a page for staff members to create, edit and delete walk schedules.
- Create a page called Manage Schedules and restrict it to the user group Staff.
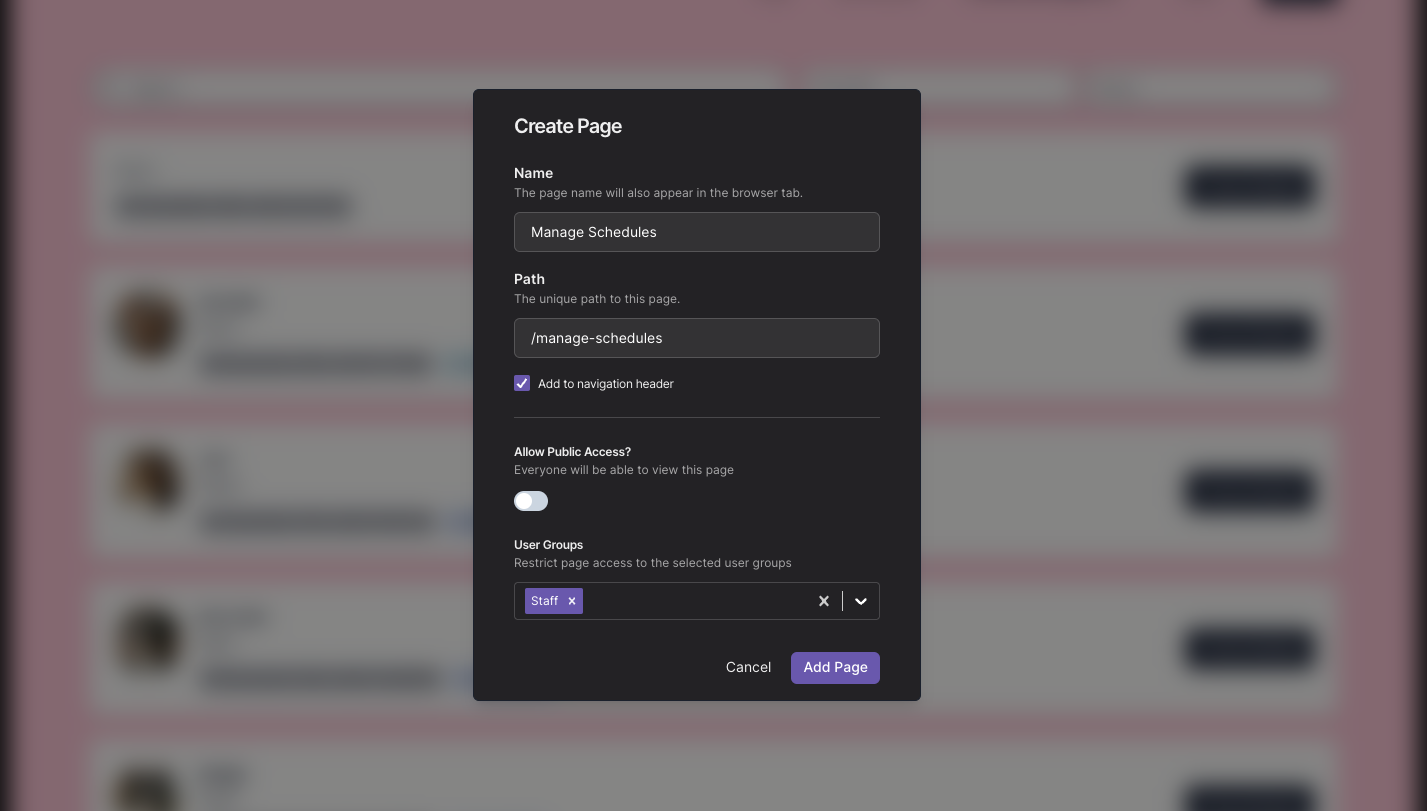
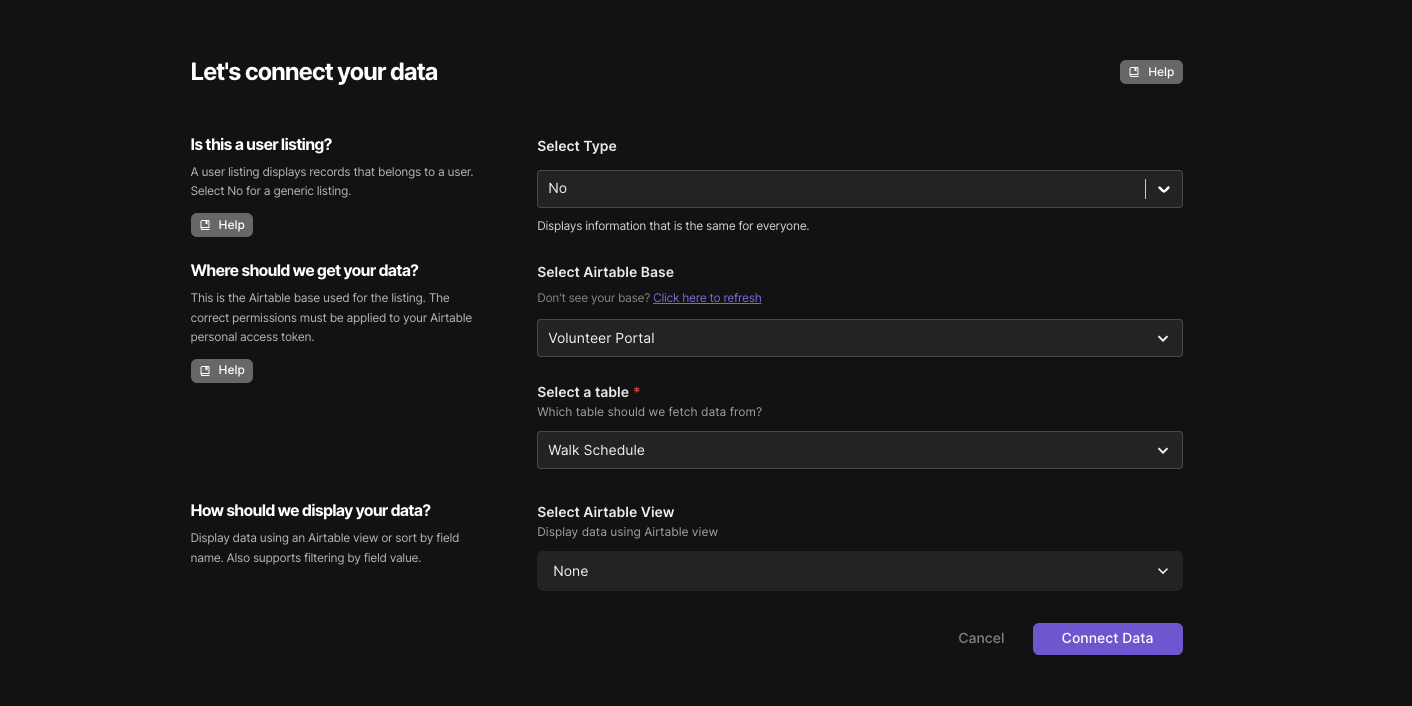
- Create a Airtable listing for the schedule.
Is this a user listing?: No (staff should see all the schedules).
Airtable Table: Walk Schedule
Airtable View: None (optional)
- Select the fields you would like to display in the listing, search and filters settings.
- Switch to the detailed view and add blocks to display more information. We have included information about the schedule as well information about the volunteers and dogs using the linked record block.
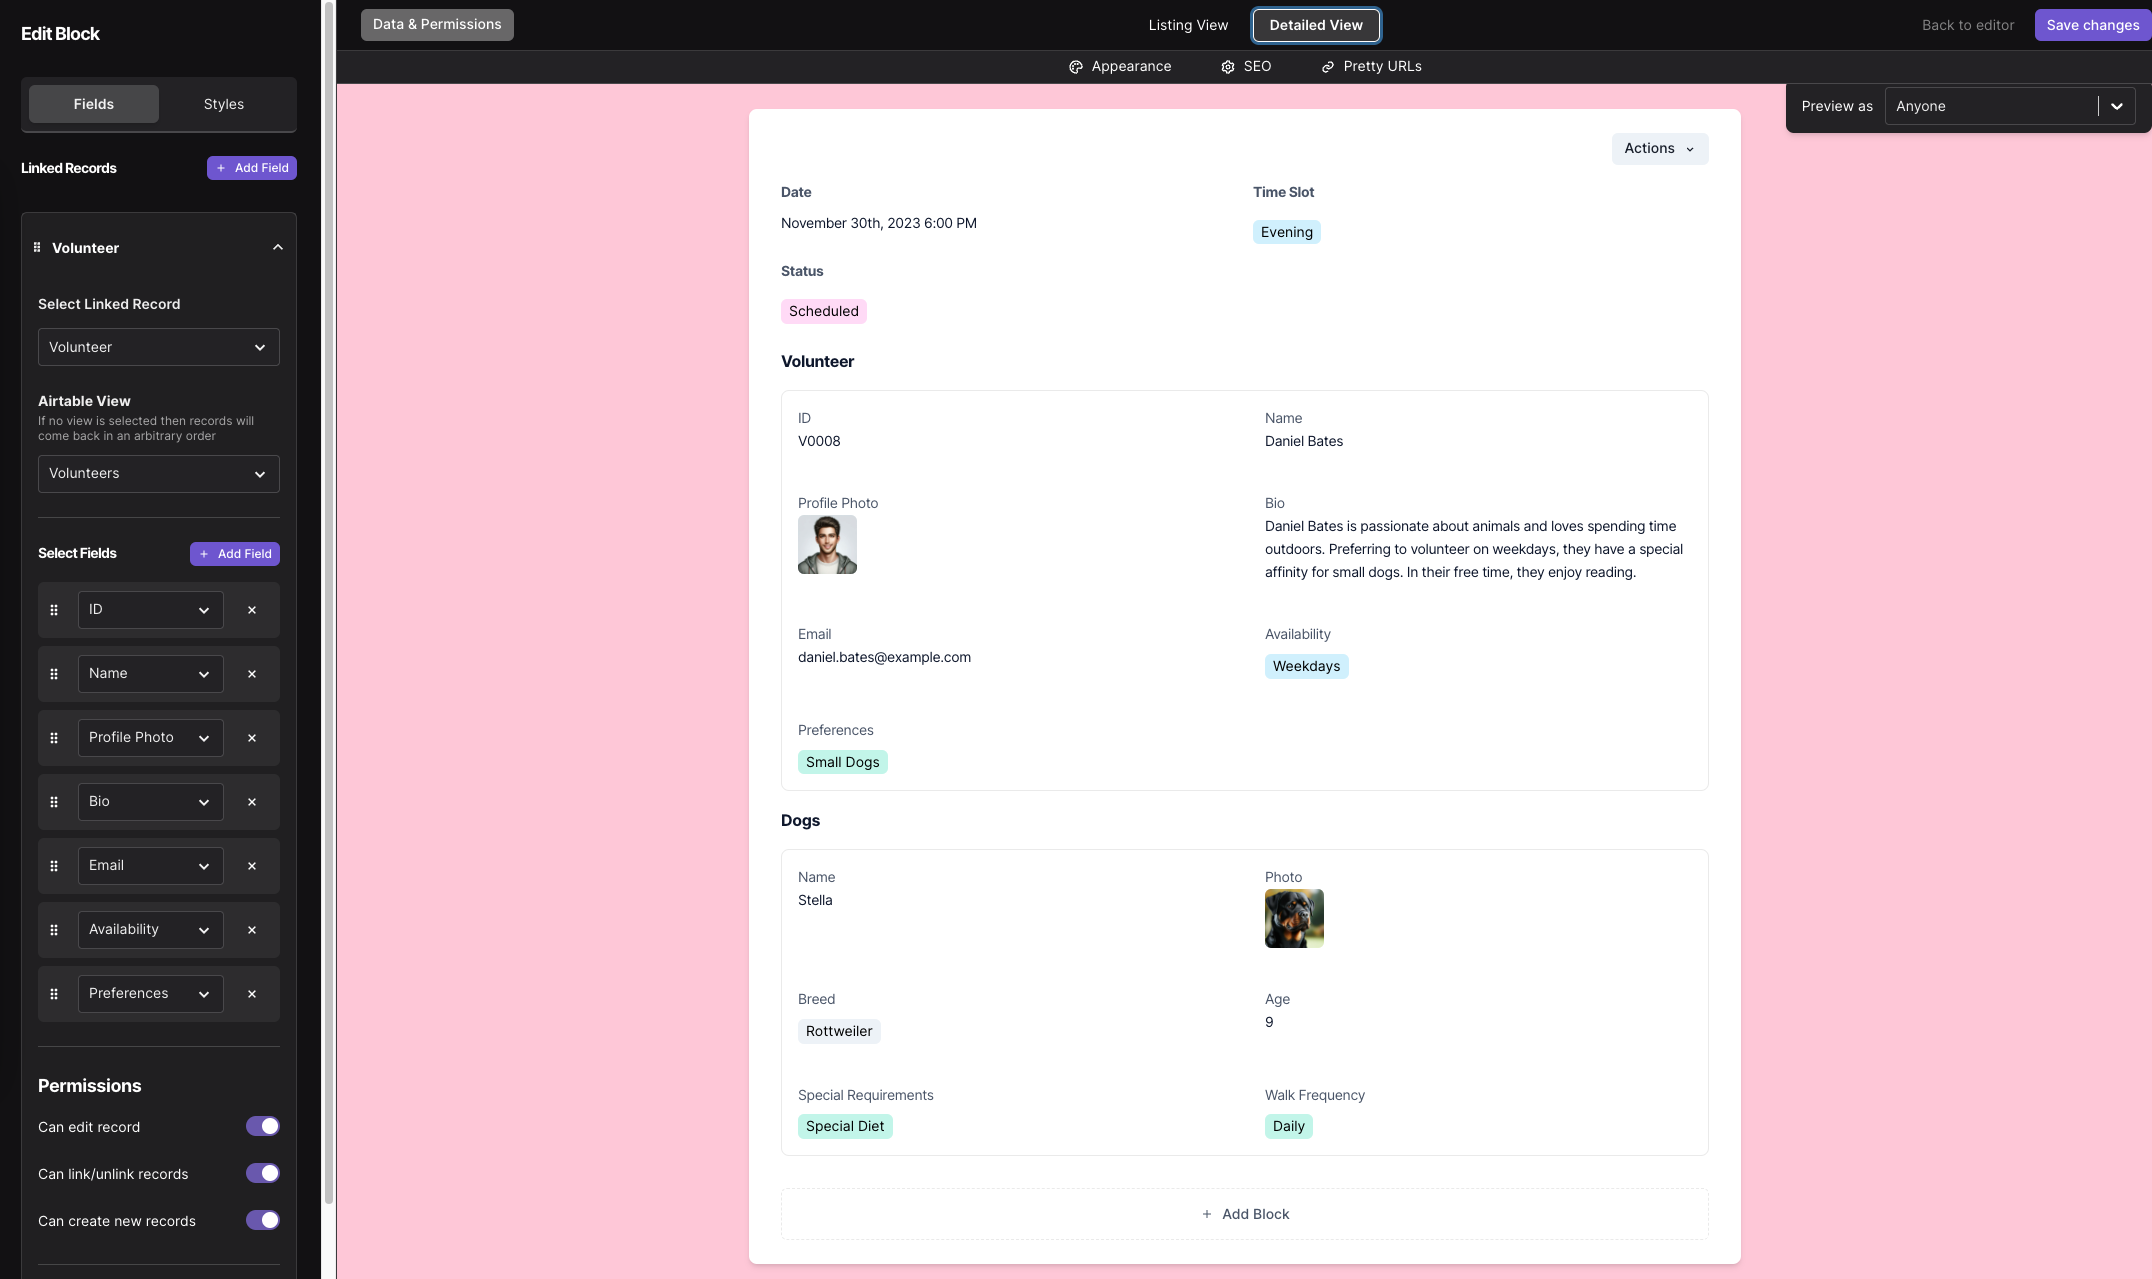
- Click on Data & Permissions and update permissions for the Staff group to include the action to Create, Edit and Remove schedules. Remember to update the permissions for the linked record blocks as well!
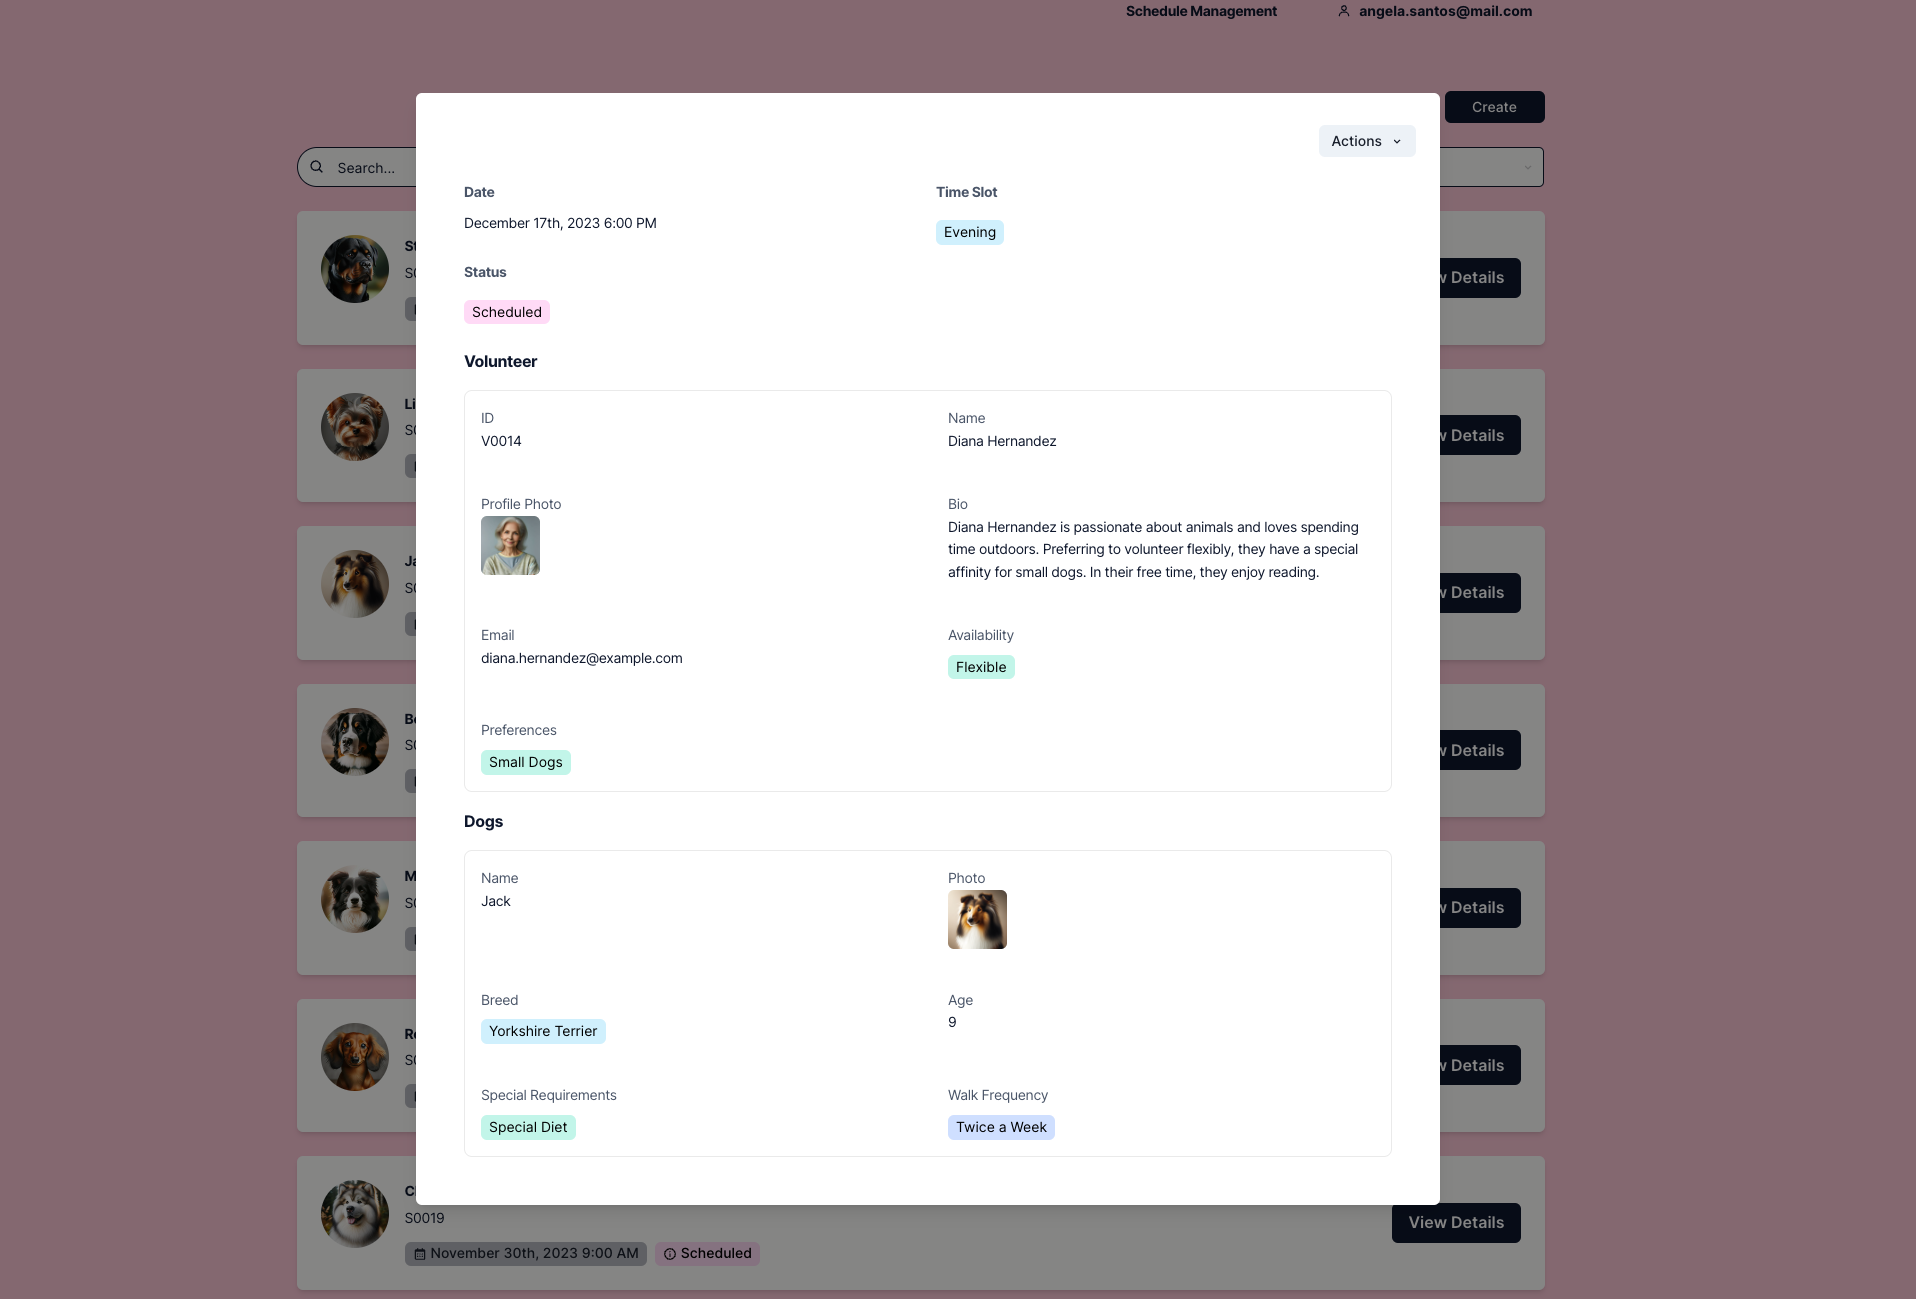
Check out the Manage Schedule page here.
The ability to create, edit and remove schedules has been removed for the demo account.
To test permissions, please create your own account in the portal by signing up.
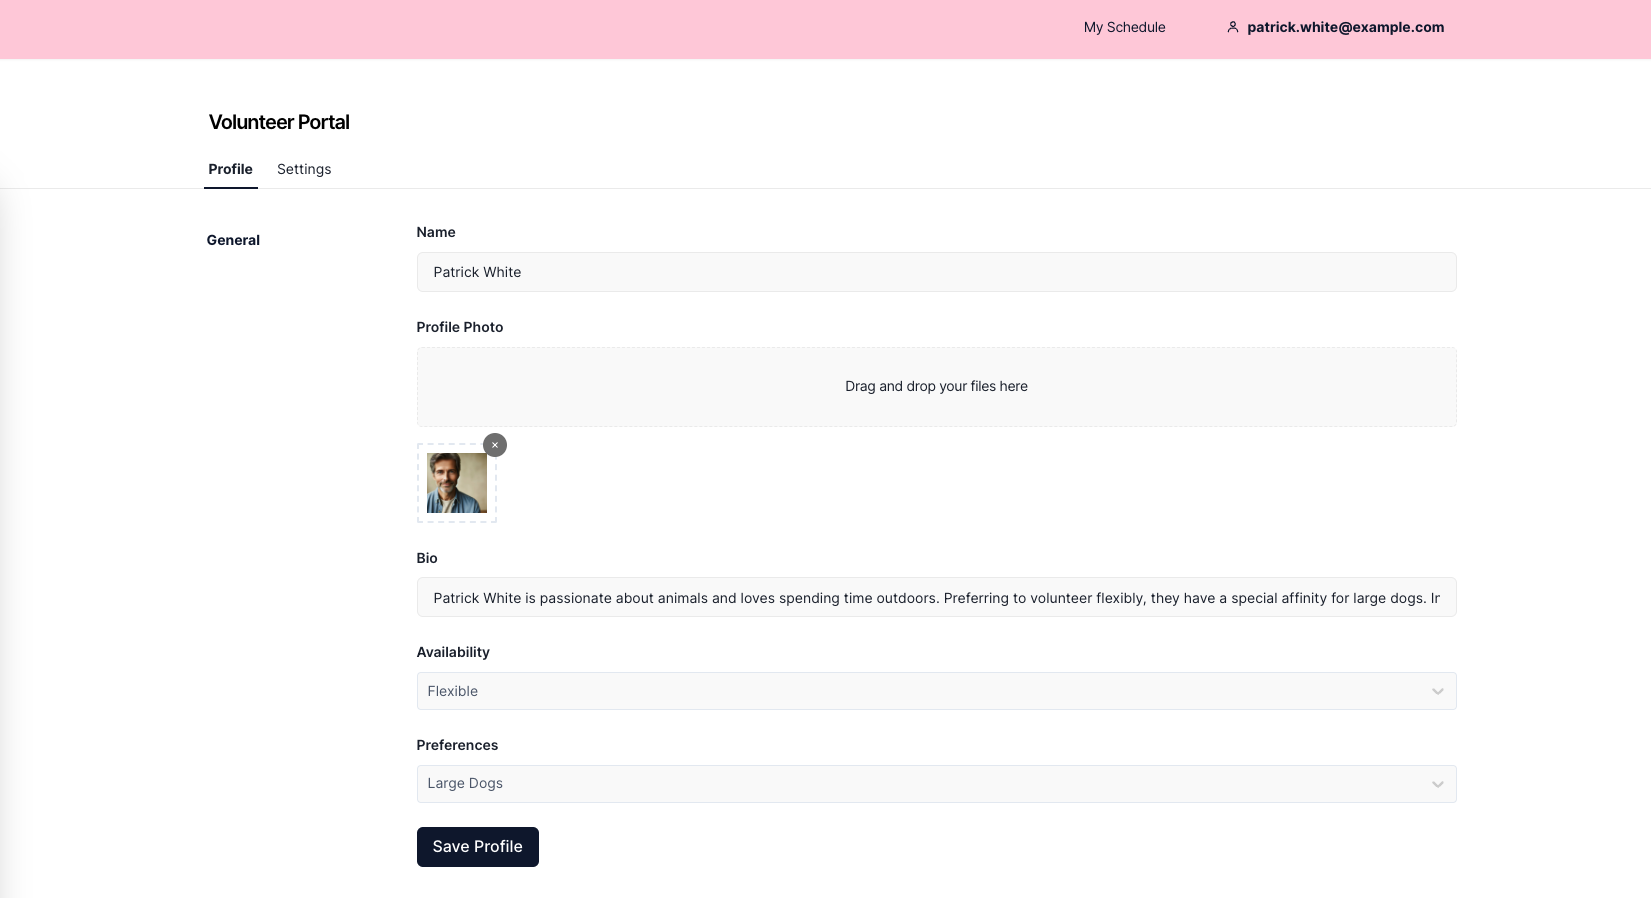
Step 4: Account Manangement
Volunteers and Staff members can also log into their account and update their profile information. This is synced with their record that is stored in the Users table. To set this up, go to the Account page builder and select the fields to include in the profile page for each user group.
Step 5: Inviting Users
Pory supports inviting users to create accounts by either sending emails or generating invitation links using a formula on Airtable. You can also restrict sign up to people who only exists in the Users table.
Pro Tip: You can automatically assign users on account creation to groups using field values from Airtable.
Demo time!
Check out the volunteer portal by either logging into an existing demo account (credentials available on the log in page) or creating a new account as a volunteer (default group).
My Schedule Page
Users who belong to the group Volunteer can view their walk schedule.
Creating a schedule
Users who belong to the group Staff can view, create and edit schedules from the Manage Schedules page. You can also link volunteers and dogs to the schedule too!